Wednesday, March 30, 2016

Wing with ribs

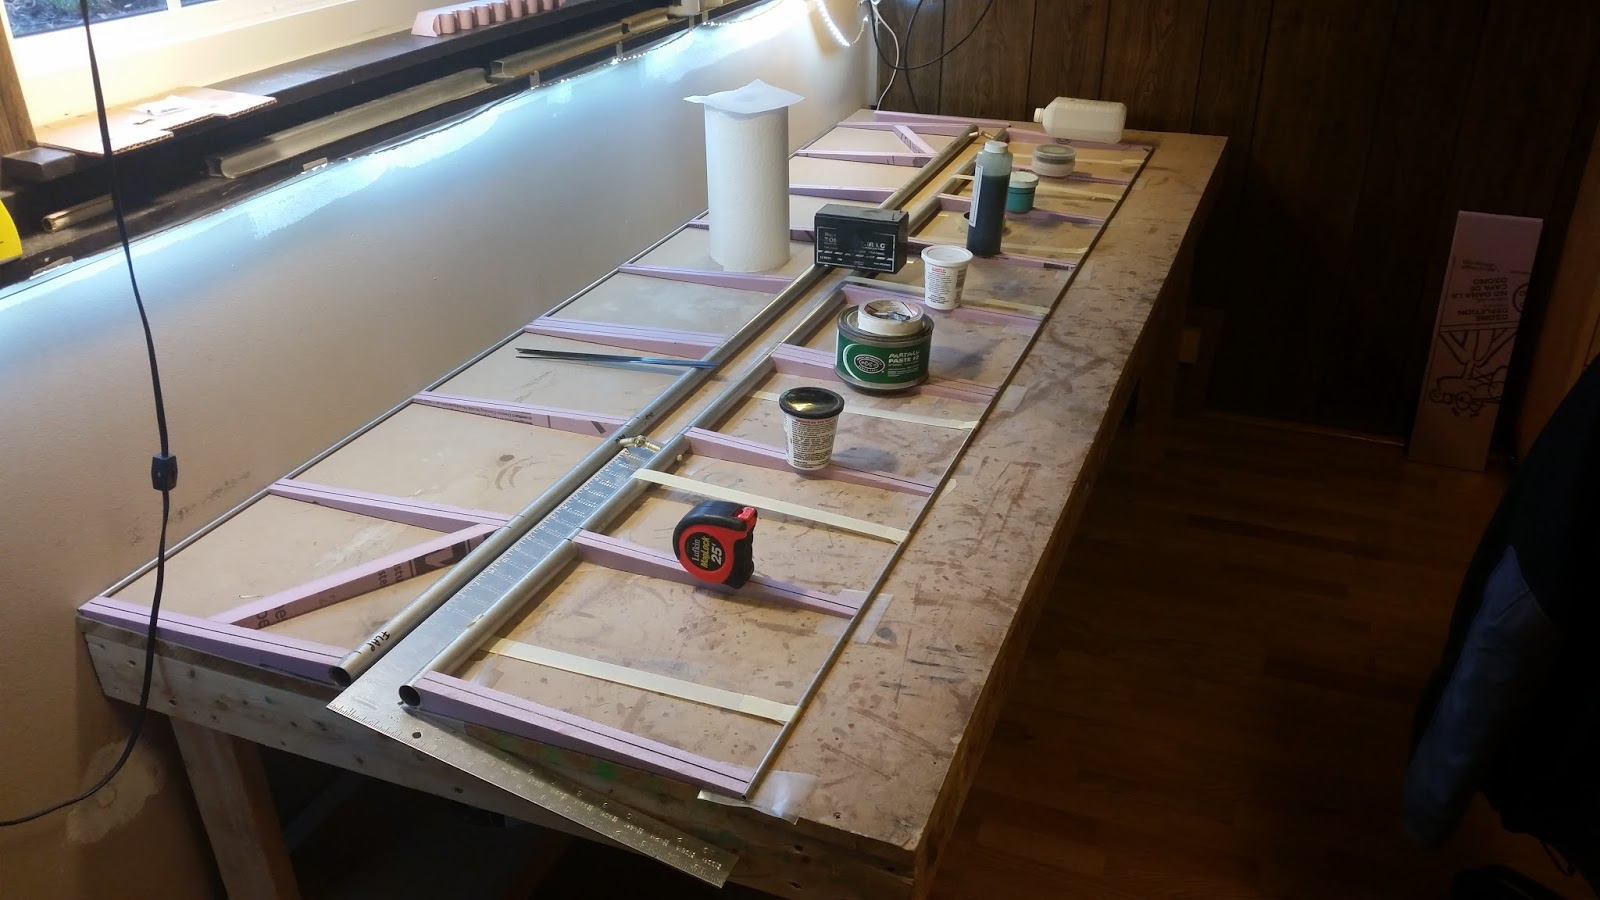
A friend said he was having trouble visualizing the wing without the ribs, so my work tonight was basically just grabbing the aileron from downstairs, installing the tip attachment (yay), bolting it on, and taping on the ribs.

Here's what I decided at the tip.  The TE was flattened and riveted to one side of the LE.  I added a small stub extension (?) that bridges from the TE to the opposite side of the LE.  This means the aileron is technically flat at the very end, but this seems the cleanest option for the lightest weight and least fuss.  From watching videos of others' Goats, the aileron seems to get fairly stressed in this area on landing and needs all the structure that makes sense.


Here are a few long shots down the span to show the airfoil profile a bit better.


And here are a couple shots looking down the control line guides.  They're still just stuck on with tape, but will be epoxied on and lashed with some glass tows to give the bond some structure.


Thanks for reading!

Tuesday, March 29, 2016

Some aileron efforts and a snag.

I've been putting together the right aileron off-and-on this week, and run into a snag.

First, the aileron rib spacing has been determined and all of the normal ribs were bonded in place.  These are the same ones CNC cut for the flaps, so everything should line up.  The hardest part was making the spacing even.  Turns out every last one is spaced at 9.25 inch intervals, compared to 11 inches for the flaps.  But the aileron moves more and I figure can use the extra stiffness.  The large gap between ribs 4 and 5 in the picture is for the control horn tube.


The aileron is hinged and it matches up quite nicely to the flap.  The trailing edge is pretty much straight, which is cool, and the angle of the hinge relative to the ribs is essentially the same on both, which technically doesn't matter, but is nice aesthetically.

Note the weird perspective makes the trailing edge tube look bent ... and it probably is bent under its own weight without the struts and jury struts to keep it in-line.

The location of the aileron control horn has also been established to keep the pushrod pretty much straight in-line with the aileron slide tube.  This should mean the least amount of stress on the guide tubes and their respective bonding.

This new location clears the strut attachment nicely.  I ended up moving the bracket outboard by one hole.  And that's where my snag hit.  Maybe I got too quick actually making a change.  I did have a great day today.

Here's an illustration of the problem.  The flap will fold nicely against the wing ribs for transport, but the aileron doesn't.  That's because the head of one of the bolts in the control horn hits the bolt of the compression strut.  Darn.  Not sure what to do about that yet.

In the meantime, I'm quite happy with how sturdy the aileron and control horn seem attached to each other.

Maybe I don't ever have to fold the aileron back that far for transport.  Since I'm building a trailer for this (at some future date), I could just plan that the aileron only has to fold a maximum of 90 degrees instead of flat against the wing.  It's a feature, not a bug!

Ignoring the snag momentarily, next is to finish the aileron trailing edge attachment at the tip (making up how to do that still), finish the last few tip ribs that are custom lengths, bond on the aileron slide tube guides, order some new jury strut material, assemble Goat in the back yard to include the flap linkage quick-link for the first time, connect up the aileron linkages all the way to the fuselage, replace the four jury strut tubes, and then make airplane noises with all three control axes connected for the first time!  Hm, doubtful I'll get through all of that by this weekend, but hopefully by the end of April.  At that point, it'll be worth having my A&P coworker over to offer critiques...

Happy spring everyone.

Sunday, March 13, 2016

Half-rack of flaps


I had enough foam ribs blanks, but took an opportunity to make some more.  This was a good excuse to pull out the CNC and try out the new garage wiring.  I also adjusted the layout of the parts in CAM so fewer ribs would be eaten by the tool (last time I cut ribs, every other one was chewed up) at the expense of wasting a bit more foam.  Definitely worth it as I am able to use every one of these ribs.  I cut two sets of 15, which is enough for the rest of the plane.


After cutting the ribs free, each was run through my little cap-strip cutting tool mounted to the Dremel.  This little tool worked like a champ, and I wish it was around for all the other foam ribs in the tails.  Would have made that job much easier and cleaner.

Last time I assembled Goat, I taped on a rib to the leading edge of the flap to match up to the aileron angle.  This alignment worked fine for me, though in retrospect, it would make more sense to build the flap and aileron, then measure and drill the hinge holes.  Anyway, I took enough ribs and bonded them between the leading and trailing edges with thick epoxy spooey and used masking tape to hold everything in place.

As the ribs were curing, I had extra spooey and so started putting the carbon cap strips into the slits.  After those cured overnight, a little custom fitting was needed to make a diagonal brace for the end rib, shown below.  You can also see the double-rib where the flying wire from the TE spar to the tail will be connected.  That attachment takes the place of a control horn, since the flaps are not actuated.

Finally, here is the flap installed on the wing, awaiting a glass-wrap on each of the ribs.  I think I'll copy the progress to this point building up the second flap before doing the glass wrap.

Second flap is half-way done and curing.

That's all for now.  Hope any readers are enjoying.  It's nice to be back building!

Sunday, March 6, 2016

Sooo many ribs

Made a run at the ribs and pulled off the completion!  Great feeling!  Soooooo many ribs now.  It's 22 total for my version of the Goat.  Had half done before today, and finished off all the others just now.  The tip and root ribs are already on the wings.


Saturday, March 5, 2016

Ribs for dinner

It's almost too cold to work in the garage.  Spring is so close...

First up was making a replacement compression rib on the right wing because it had several extra unneeded holes.  Looks like it used to be the root rib, and had a Sharpie note that the old holes were twisted.  That completes replacement parts on the right wing that I can tell so far.

Half of the ribs are ready to be attached to the wing, and half of the wings now are all pre-bent and simply need leading and trailing edge flattening and the installation of the right-angle stop brackets.  I have to be in a good mood and get into a good rhythm to tackle this job.  It'll likely take a few hours, and there are only 11 ribs to do.  Boy, it'll be nice to have the ribs done.


I don't think I've ever showed this Goat 3 rib with its different construction method and airfoil.  It was a lot (!) of work to build this compared to the simple upper ribs with flat-bottom, but it would have been interesting to determine the performance difference.  I suspect that there would have been improved L/D with the reduction of drag.  Sandlin's notes on the Goat 3 included both this airfoil and a wing area change.  Perhaps if the wing ever needs to be re-covered, that would be a fun change to make.

The shop also got some rearranging recently.  This wall alone now has six new 20A outlets that go to a new 50A sub-panel in my garage, installed around the New Year.  Previously, the whole garage was serviced by a single 15A outlet.  The CNC machine started tripping the breaker when I added a second vacuum for hold-down tooling and that set the whole garage rewiring project in motion.  As a side benefit, the new tool bench is much sturdier than the old one with a 1.5" plywood top, and this also opened up the long wall of my garage for better storage of the long Goat wings; with the wing tips installed, the wing halves barely fit, and were a pain to lift over the band-saw to hang for storage.  Great improvement.

There is a sticky situation with the flap/aileron not folding all the way against the ribs like they're supposed to.  The aft-most eye-bolt should have been one hole forward, rather than going through the trailing edge.  This is likely a difference between Goat 4, which is cable-braced, and Goat 3, which is strut-braced.  Unfortunately, moving the eye bolts means the jury struts will need a bit of rework, since the spacing will change by around 2 inches.  Hopefully there will be no changes needed on the struts themselves.  Next time I fully assemble Goat, this is something I'll be taking a close look at.

Sunday, February 28, 2016

Updated weights

Working on the second half of the wing is much easier since I just have to copy measurements from the other side.  Items accomplished last Sunday and today include:
* added tip and bracing to left wing
* added root rib and bracing to left wing
* made and added aileron linkage plates to left wing
* drilled and installed flap and aileron hinge pins to left wing trailing edge tube
* installed doublers and hinge pins to left wing flap and aileron tubes
* bent aileron trailing edge radius near the tip
* temporarily taped on the aileron and flap ribs
* weighed everything

Current weights (sans covering)
Tail 11.3
Struts 5.0
Stab 5.2
Nose 25.1
Left wing with flap 22.8
Right wing with flap/ail 25.1
Ribs 3.7
Misc 2.7
Total 100.9

Both flaps ready to have carbon rods and glass wraps on the ribs.  The left aileron needs two bolts holes for its control horn attachment.  Both ailerons then need carbon rods and glass wraps on the ribs.  The aileron turning pullies (to get from wing to torque tube) are built, but need to be installed in the root area.  At that point, I'll definitely assemble everything, make the control lines (already ordered), and make airplane noises while finally wiggling the wing controls.  There is also a small tab to install on the flap that attaches it to the tail rigging lines.

Other to-dos include working on the ribs.  I have enough completed ribs for one wing half.  For the other half, all but one rib are pre-shaped, but need the leading and trailing crimps and right-angle brackets attached.  That'll finish off the ribs.  It'll be glorious to have the ribs done.  I'm going to leave them uninstalled until after the load test.

There are some minor items that need clean-up.  For example, I have two compression struts that were mis-drilled with twist long ago, which need to be replaced.  I have material for them already, just need to do it.  I also bought material to replace the cabane aft struts; I must have seen something that I wanted to rework.

I know there will be several more areas to rework after I have over an A&P friend to have him provide some feedback.  He has already mentioned skepticism about using "rope" for control lines.

At some point in the near future will be to build a rig for the load test, and a wing rack for holding the covered wings, oh and covering the whole airplane in general.

Maybe I'm not as close as I joke :-)  It's getting there.

Saturday, December 12, 2015

Oratex tests

A sample kit of Oratex UL600 from Lars at betteraircraftfabric.com is my first real look at covering Goat.  I watched a good bit of youtube looking at covering techniques of Oratex, but in the end, it's just like model airplane covering.  It couldn't be any more similar, with the exception that you paint the adhesive onto the fabric and structure instead of it coming pre-applied.  Once dry, an iron sticks the fabric onto the structure, and a heat gun pulls out any wrinkles in the open bay panel.  Very straight-forward.

The sample of white that Lars from betteraircraftfabric looks a lot more pigmented than the "natural white" color.  I suppose if you were painting, it would be fine with natural, but the pigmented white looks much nicer to me.

Boy UL600 is thin.  Not entirely sure what I was expecting in the fabric.  Maybe something more akin to a Dacron hang glider leading edge?  That stuff is stiff.  UL600 is thin and light, by comparison.  That makes sense given it'll take somewhere around 40 sqyd of fabric for Goat (rough estimate).  At 3.24 oz/sqyd coated (per the datasheet), that's about 8 pounds of fabric weight.  Adding glues and tapes will be a few more pounds I guess. 

I tried to stick a finger through the covering sample and it has some resistance, but just flexes and doesn't break.  A coworker of mine has a maule tester that will be interesting to see used on this test piece.

For surface prep, I went over the aluminum with a green scotchbrite pad, which definitely removes the shine and leaves a haze with a visible brushed look.  I just wiped this with a clean cloth, but had a couple spots that seemed to fisheye when applying the adhesive.  Not sure if this was insufficient scuffing or insufficient cleaning.  Next time I'll use a wipe with isopropyl to make sure any finger greases or dust is removed.

Fabric and frame built and prepped; glue is dry on the frame and dry on just the edges of the fabric (you can see a difference in color/texture).
Mid-way through the covering process, having just gone around the perimeter and wrapped two edges.

Almost finished.  Now I'm waiting for another round of glue to dry so the edges can be ironed down.


Done.


I found this review helpful:
http://www.kitplanes.com/issues/31_7/builder_spotlight/oratex_covering_21029-1.html

Locations of visitors to this page