 My lovely wife got me a first training lesson at a local flying club. It's quite impressive timing that our day was so calm for having been blowing +20mph for the past two weeks... We stayed at 2500ft and flew locally in the SFZ north of Washington DC. Having flown general aviation so infrequently and only at uncontrolled airports, it was interesting to actually have to file a flight plan. But it wasn't that bad actually.
Once getting to know me a bit, my instructor-for-the-day Oren walked me through the pre-flight checklist and we taxied to the runway. I was interested as I got a good walk-through of the engine run-up, hearing how to use carb heat and what to look for with the instruments. We taxied out and the takeoff was a piece of cake. It's funny how temperatures in the 30's helped the performance. We were at 2500ft in no time. Oren said "alright, plane is yours" and I avoided the rookie mistake of trying to do anything. Heh, new RC pilots have the same tendency of immediately jamming a stick to the side when given the controller for the first time. So I basically let the plane fly itself. It's stable, why do anything? It has been a while since I flew, but it was easy to pick back up. Oren asked me to do some turns and fly to headings. Not bad. It's a lot to remember, watching airspeed, keeping track of altitude, remembering to glance for my heading... not hard to keep the plane in the air though. That was apparently easy enough, Oren suggested doing some slow flying. He put in some flaps, had me pull the throttle back (whoa cool, I moved the throttle!) and I worked to figure out the new pitch attitude to maintain airspeed. A couple gentle turns got me some feel of the difference of flaps being down. Well, time to pull them back up and go back to the airport. I got to put us in the pattern, but then it was back to the pro for base and final.
Not bad for a random snowy day!
From the perspective of Goat, I have no fears that I can pick up the skills. I'm thinking of doing the same in a glider and making sure to request some good stalls and spin recovery to get familiar with the entries in particular. Welcome back motivation!
Saturday, December 18, 2010
Flight training time
Monday, December 6, 2010
Fixing a canoe
Canoe believe (heh, love the water humor) that I took a break from the plane to work on a boat? Okay, it really only took a half-day. First was to flake off any loose fiberglass from the last repair, meaning most of it. Next was to clean up any poky sharp bits. I used the edge of a chisel to put some deep scratches in the area where the repair cloth was going to go. The rear damage actually had a full hole into the boat. For this, I mixed up a small cup of resin thick with cabosil and then tried some chopped strands. The resulting blob was a tarball that would slowly ooze off the stirring stick. I stuffed this into the hole, taped over the hole with masking tape, and flipped the boat over to let the epoxy settle into the el-cheapo masking tape mold. Worked like a charm! I had a little run-out where the masking tape wasn't perfect, but knocking off the sharp edges with a chisel did the trick. While the epoxy was still green, we started putting on layers, bringing resin up through the cloth by putting raw epoxy down first and using squeegies to mash the cloth into the resin and ensure it was fully wetted. I forget already, but we put some 8-10 layers of 6oz tooling cloth in the damaged areas and feathered out from there. The last layer was a large piece to tie everything together and give a nice finish. It didn't need to be smooth since the rest of the bottom of the boat is scuffed up from years of use, so I left raw 6oz print.
I haven't tried one of these slide shows before, so please ping me if it fails...
Goat is slowing down until I have more space to build a wing... I'm hopeful for early summer to have a basement or at least a dedicated room. Fingers crossed ;-)
Friday, October 22, 2010
Sunday, September 26, 2010
Ovalizing the nose fairing tube

I finally pulled Goat back out for some work. I ovalized the nose fairing tube using my vice and some perseverance. It looks pretty good mounted on the fuselage section, but I didn't take any pictures of that yet...
Saturday, September 25, 2010
Hang Gliders!
 I happened to be in Utah for business and ended up with a free day. A new friend, Greg, took me to the local hang-glider site in Salt Lake City. I believe this was called the South Side and is a small cousin to the North Side of the famous Point of the Mountain at the Wings over Wasatach field. Despite being the smaller of the two locations, I was rather impressed at the 200 ft cliff at roughly 45 deg steep and in the perfect bowl shape for flying. Greg got off two flights and a few other dudes were flying as well. I took wayyyyyy too many photos, but wanted to share a few highlights here.
Setting up Greg's "old rag-wing."
Putting in the lower battens.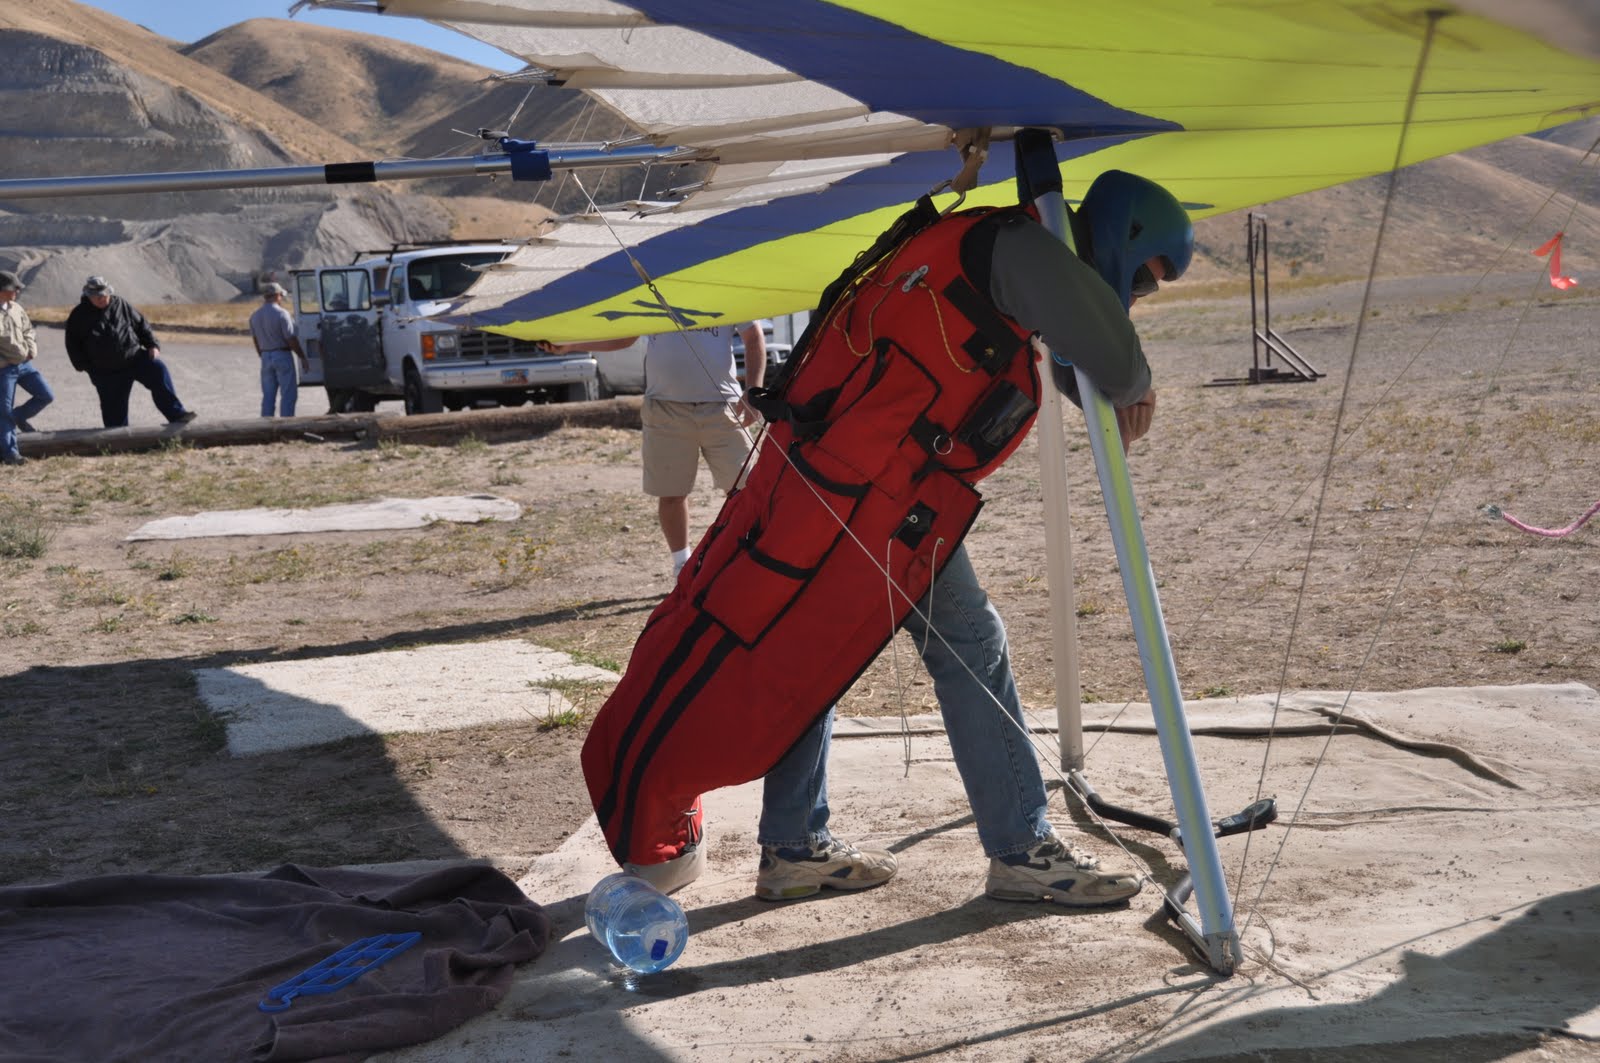
Strapped in and ready to fly!
Taking a giant step...
Setting his feet looks rather awkward, but it's not a problem.
And just like that, Greg quite literally flies with the birds!
Thursday, September 16, 2010
A few comment replies
I wanted to reply to a couple recent comments from folks...
Hi George,
I'm glad you're enjoying the close-up photos. I too was struggling with Mike's zoomed-out pics and really wanted to fill in some missing gaps. I'll work on posting some more close-ups, especially if you have any requests!
I'll see what I can do with the key-words for finding this page easier. Great suggestion.
I don't have a parts list, per-se. I have kept every order form, so I definitely have an order list if I go through the pile. Some of Mike's bolt call-outs didn't work for me, so I'd really just prefer to measure each assembly to make an as-built list.
I haven't done any welding, especially aluminum. The reliance of Sandlin's design on thru bolts was attractive for a novice metal worker, so I'm following by-the-plans. Most every rivet I've found is either non-structural or backed up by several other rivets (as on tube end inserts).
I'd love to see you start up a build-log as you get your project up and rolling! The support is worth it alone :-)
Hi Craig,
I'm just busy :-) Spending two weeks in Utah for work currently and I've been working on an RC Long EZ project for the past few weeks after working on an RC discus launch glider project with some old school buddies.
And now for everyone,
In other news, I'm about ready to go get the wing tubing! It's a couple hour drive up to Pennsylvania to pick up tubing at Dillsburg Aero-Works ... and I have to figure out how to stuff 12ft tubing into my little Civic.
I'm also ready to try my hand at covering. I have enough material to do the rudder. A local guy gave me some tips how to use the Stits Poly-Fiber method, given my weight constraint. I need some Poly-Tack and Poly-Span and MEK. I think I'll go get that wing tubing first ;-)
Thursday, August 12, 2010
Birthday tool
 Thanks for a wonderful birthday present, a 10" drill press for working on Goat and anything that needs drilling. I'm so tired of hand-drilling all the brackets and tubes and getting them misaligned, so it's going to be wonderful to simply clamp it up and drill.
Meanwhile making the drill stand, I also finished cutting, deburring, and drilling all 8 of the wing compression strut fittings. Yay, progress (yeah, I know it seems slow right now)!
Thursday, July 29, 2010
Wing parts
 Cutting, cutting away ... I finally finished making all 16 of the G4W2 strut fixtures. One at a time, they're a pain, so I did six a shot out of a piece of 2.5" sheet stock. They look better in person than with the camera flash, and they'll get a final clean-up with the fine file. I also knocked out half of the compression strut channels from G4W6. Four more to go...
Monday, July 19, 2010
Stuck in the elevator?
 No longer stuck! And now there are two aluminum supports instead of just one. I'm feeling rather happy with this arrangement, given how stiff the right elevator half now feels compared to the actuated left side. It's a small change, but makes me feel better. Watching the video of Floyd flying at Torey, I realize that the elevator really is going to hit its end stops and need all the help it can get.
I also settled in to the idea of bolting the seat belt to the frame, so I finally drilled the holes and slipped in the massive 5/16" thru bolt. A quick whip with the deburring tool and both belts are mounted! I also put in some seat time and figure the 2A style buckle should be enough for the first few hops. I shall revisit this as necessary.
Tuesday, July 13, 2010
Red Goat video at Torey Pines
This video of Floyd Fronius is too cool not to re-post from Sandlin's update page. Four minutes of un-narrated and multiple-view aerial video from Red Goat:
Thanks for posting Mike!
Sunday, July 11, 2010
Seat Belt fun
Thanks Mike and Alan for comments about the seat belt. This is very valuable experience for you guys to share. In light of your feedback, I'm going to make sure to change or at least seriously evaluate how easily the belt opens before any flying. I can find a replacement lap belt with the push button type buckle with the same steel end plates, so I figure installing this belt won't be a backward step. The original location Sandlin used was to loop the webbing material aft of the rear seat tube, just forward of the structural wing cable/strut attach point. Since I'm using the steel plate style with a 5/16" bolt, this location doesn't work exactly. The belt would rub on the end of the lower seat tube. My option is to move the belt to frame attach point forward.
Trying to figure out where to mount the lap belt, I have turned to aircraft standards, which are less descriptive for this mounting location than I hoped. From my student club days, I know the Formula SAE car competitions have stringent requirements on the students' creations, so I consulted the 2009 rules: http://www.sae.org/students/mbrules.pdf. Section 33.3 covers lap belt and in particular Figure 9 (shown here). The Formula SAE regulations give a minimum of 45deg to a maximum of 65deg for the lap belt centerline to body angle. I clamped my belt in my proposed location and took a side-on self-portrait to compare the angle. I'm relatively happy with this angle, maybe even fine sliding the bolt forward a bit, and figure my updated seat will put my behind in a similar location for the belt angle. I'll probably sit on this (pun intended!) for a few days and pull out my 5/16" drill bit.
Thursday, July 8, 2010
Some stainless hardware
 No, not knives ... stainless steel clips, buckles, and coolness!
Berkley Point has the cutest little micro spring-clips that will do great keeping the horizontal tail secured. The extra spring-gate clip is actually going to be for the seat belt. The thimbles I purchased simply to have some on hand. And the "web threading plates" are for the shoulder harness of the seat belt, for 1" webbing.
The Aircraft Spruce order arrives tomorrow afternoon. What perfect timing for the weekend :-)
Sunday, July 4, 2010
4th of July order
Okay, I bit the bullet and ordered all the remaining hardware for the wing & miscellaneous areas. It's a hodge-podge of bolts, some tubes that Dillburg didn't carry, and a seat-belt in there for good measure. On the seat belt, I'm going with a Style 2A and think I'll use the steel end-plates and 5/16" bolts through the frame instead of simply using rope. I'm pretty sure all the other tubes would be bent before the tied version of the seat belt broke, but I feel more secure with a massive bolt.
Saturday, July 3, 2010
Steady progress
 I did a bunch of work last weekend and figured I'd share. The control line came in sometime I think two weeks ago. In the same order from West Marine, I picked up two RF1853 Wide-D shackles. I was worried because they are 1/16" too narrow, but other folks seem to have them listed in their parts lists. After drilling out the threaded end to a 1/4" thru-hole, I had the anticipated problem fitting the shackle over the cabane end. These little parts are rather stiff too, being hard to force open a bit to slip over the ends; I tried to permanently deform the part, which might have helped a little. Anyway, they're on now and I'm sure a bit of tweaking will help the fit over time.
 The major win last weekend was some time spent with a home-brew bending jig made from scrap 2" tubing and piece of MDF. I finally bent the elevator 3/8" x 0.035" trailing edge tubing and the other matching half. I'm pretty sure I've had this tubing since the very first order, so it's almost funny how long it has taken for me to get to this point. Now that I have the trailing edge on though, it makes the tail so much cooler ... when I move the elevator stick, something actually moves back there!
I am debating with the right inner trailing edge to hinge tube connection whether to use the fiberglass attachment method or borrow an idea I saw on another Goat construction site to make a more typical gusset plate type attachment. Right now I'm leaning toward the more rigid, but heavier, method. I've flown enough RC planes with similar torque rod arrangements for the opposite elevator half to know that a symmetric elevator is really nice to have. As part of the elevator work, I was on a roll and also pulled out some foam and a new X-Acto blade to cut the ribs. Because these have a taper to them, they have to be cut individually instead of the all-at-once method I was able to use on the horizontal tail ribs.
Just last night during a really bad movie on TV, I made the slit to install the carbon rod spar caps. Unfortunately, I have now finished my carbon rod stock and was two ribs short. Fortunately, I recently came across a cheap site for more carbon rods (http://www.goodwinds.com). I need to get some 0.020" rod for hand-launch glider pushrods anyway, so it's convenient timing. I also re-made the two right angle brackets that hold on the tail struts to the vertical tail. One of the previous ones I accidentally ovalized when drilling the 3/16" hole. This time I also took more time to make sure the strut can rotate around freely without binding. Yay.
In forward thinking news, I struck a deal for the timing of purchasing tubing for the wings. Aircraft Spruce was really expensive and would destroy me for shipping 12' tubes, so I'm going with a less-advertised company that is only 2hrs of driving time away: Dillsburg Aero Works in Pennsylvania. Their price was much better and I can go pick up the tubes in person to save on shipping. Look for a huge aluminum order around mid-August :-)
Sunday, June 13, 2010
First time assembly :-)
 Thanks to Matt for coming over and helping move Goat outside for the first time ... nice to get some grass underneath the wheel!
It was a neat test on the assembly procedure too. It's a pretty quick assembly, maybe 5 minutes for what you see put together. I imagine adding the wings and associated cables would double the time, but even that isn't too bad. It'll take more time driving than it will to get through the fun assembly time.
It's a little bit rickety right now without the cable bracing. The rudder makes the tail rack a bit, even with the stretchy line. I'm looking forward to having the real low-stretch control line. The wings and cables will be nice too of course, heh. Oh yeah, the neighbor kids of course found us. They were a bit rough on the rudder. Sonya sure is cute not reaching the pedals though!
The only casualty is two $0.18 bolts that fell in the grass, DOH.
Wheee!
Cooking with gas again! I was never really satisfied with 25deg rudder for only 1" rudder pedal deflection, so I started the morning by making a longer rudder control arm. I lengthened the part by 1" each side and now the pedals feel much better.
I also ordered 1/8" AmSteel-Blue 12-strand rope (very-low stretch) for the rigging. At only $0.43/ft, it wasn't too hard of a choice to use the "free shipping" that West-Marine has going on this weekend. I did a LOT of research yesterday to move away from the Lightning Rope. The AmSteel-Blue looks to be the updated version of Lightning Rope. It has a similar low-stretch: less than 1% elongation at 30% of breaking strength (2500 lb). Sandlin spec'd 7/64", so since I'm deviating I thought it was prudent to go the next size up to 1/8", which costs only two-tenths of a pound per 100ft of rope and gives almost 1000lb extra breaking strength. I'll consider this well-purchased insurance and eat the nose weight. Speaking of control rigging, I finally used some of that Berkley Point hardware to connect the lines in a similar fashion to how it's supposed to work. Previously I had been simply tying new knots every time I assembled the plane. Now, I can get used to connecting the quick links to the snap hooks and start making a mental procedure to keep from connecting them incorrectly. I haven't set these up for the right lengths yet, so don't stress. I did install four new line guides on the bottom of the main fuselage carry-through tube. Coolbeans.
 Last, I installed the tail strut end brackets on ~Thursday evening. They sure make quick assembly of the horizontal stabilizer onto the vertical tail. It's super nice to have the horizontal structurally held in place rather than with the stupid string I was using.
Feels like it's all coming together. 'bout time to get material for and start on the wings and feel under-whelmed again, heh ;-)
Wednesday, June 9, 2010
A whole evening for two parts
 Does anyone have a better way to cut square holes?
I made the upper two ends for the horizontal tail support struts tonight. They are supposed to fit over an AN-42B eye bolt on either side. Sandlin has the builder to cut a row of holes and file down in-between to make a slot. I have a set of pin files that I've practically worn smooth now... whew, a few hours ticked away, but I'm done with the two strut ends.
Monday, May 31, 2010
After camping Goat work
The first annual Memorial Day camping trip is over and the 10 miles we hiked on Sunday is still hurting my calf muscles ... wow. Goat is for some reason back on the front burner. I decided today to work on the tail struts. After cutting and filing the four pieces, I fitted one end of each and have yet to cut the struts to length until I do the final alignment against the vertical tail. I also should note that Aircraft Spruce did not have 3/8 x 0.035" in stock, so I used 0.058". This puts more weight in the tail, which is never a good thing, but the extra security feels nice.
I also assembled the whole aircraft (minus wings) in the apartment again. This included finally drilling holes in the upper vertical tail attach point to accept the upper pin; this tube end was replaced when I mis-drilled the original, so I took my time. Now I can fold up the vertical tail and use the real forward pin to attach it to the lower, rotating vertical tail part from G4T14. Two birds with one stone. The control lines are currently simply a tied up messy bundle and rather stretchy. I really should use the quick links and at least make my temporary lines the right length. I just noticed in the picture that the right rudder line is running beneath the wrong tube. Remember this setup is temporary. Also temporary is the lower attach pin is shown here as a 3/16" bolt before getting stepped up to the correct 1/4" diameter.
 Oh I also took a shot on Friday of the horizontal tail ribs still with peel-ply. I'm really dissatisfied with the finish of the blue foam compared to the pink foam. I think the bond is roughly equivalent, but the finished rib in blue foam sure looks comparatively awful. It's all hidden by covering in the end of course...
Friday, May 28, 2010
More ribs
 What can I say? I've not been working much on Goat recently. Sadly, the Sandlin main site is down too :-( Instead, I've been making composite discus-launch glider pods and just starting to make molded horizontal tail mounts. The techniques have certainly been perfected by others, but I'm finding it rather rewarding to improve my own skills. Each fuselage is taking about an hour of prep, an hour of layup, and a half hour of cleanup. The tail mounts are still slow, with only one flyable part out of the mold thus far. Thought I'd share a picture of the current inventory, which doesn't include the two I've given away to friends.
 I did do a little work on Goat today and over the last week between test flights at work. I finished putting the other graphite rod in the long rib blank and sometime over the week cut and installed the four remaining ribs. Yesterday, I wrapped the ribs with fiberglass tape, using 3M Super 77 to make the process easier. And this afternoon, I cut eight strips of peel-ply and epoxied all the ribs. A little cleanup a few hours ago and the horizontal tail is looking rather complete!
I know I shouldn't, but I looked into covering a bit. A coworker recommended the full Stitts Polyfiber treatment as the best investment ... but it's sooo expensive, on the order of the price of materials in the whole airframe. I'm wondering if I'm reading too much into the process, but I haven't found a great tutorial online to review and see if I'm just being overly conservative. Suggestions are welcomed. I have a long way to go before covering.
To do:
* finally remake the last two cabane truss members I've been meaning to do
* make a jig and try bending a new keel tube, make a replacement fuselage carry-through assembly and match drill several existing bolt locations
* drill the top tail attachment in the re-built upper tail tube (*mega alignment needed*)
* finish gluing the foam crush supports in the vertical tail
* final drill the vertical tail lower control rod guide and rivet it on
* make the horizontal tail struts
That's plenty for now...
Wednesday, May 5, 2010
Mmmmm, Ribs

 I stole some time from my take-home final and worked on Goat over the last week (?). I can't really remember when I did this work, but I have a few pictures.
To the left is how I'm making ribs now. I cut a several foot long piece of 1"x1" pink foam, made a slit for the carbon cap, and glued each long cap in at once. The picture to the left shows the first of two caps getting bonded in the slot, this time with West Systems resin. The board and PC power supply are simply to keep the part straight as it cures. To the right is one of the completed ribs, installed near the tip of the horizontal stabilizer. I bonded the unfinished rib to the leading and trailing edges and added a wrap (with 3M Super 77) of fiberglass cloth. I have yet to put resin on this cloth (like I showed for the rudder ribs) instead waiting to have all eight horizontal stab ribs ready for that stage at once. Now I simply need to make six more foam ribs... I had some leftover curing epoxy from another project, so I started gluing in the tail anti-crush foam blocks. These go between the 1/4" x 0.035" truss tubes on the vertical tail. This is the aft-most lower corner block bonded in place.
These foam pieces see virtually no loading that I can think of. Maybe they see some shearing from torsional twisting of the whole vertical tail ... but the fabric will probably take most of that load. I think they're mostly to keep the covering from dimpling the thin truss pieces in. So, I didn't work too hard on getting a super-uber-bond. I did remember to take a finished shot of the lower horizontal stabilizer control rod guide bushing support structure. I mentioned I believe last post I added an additional wrap from what I had a picture of.
You can see the PVC bushing (white) held firmly between the two 1/4" x 0.035" truss members and with two layers of 1" fiberglass tape wrapped around the trailing edge tube, all of this supported by a foam stand-off. I'm quite a happy camper with this arrangement.
Friday, April 2, 2010
Tail work
 I'm back ... slowly.
I did some work on the rear tip of the vertical tail, namely on the elevator control linkage area. I added the PVC guides between the rear 1/4 x 0.035" tubes. Instead of just making a slurry of epoxy, I manufacturer a couple foam stand-offs to tie the guide  tubes to the structural member. I 3M'd some 1" wide fiberglass tape around the foam, PVC, and aluminum tube, then I added some thickened epoxy to fillet the sharp intersection of the 1/4" tubes, then I 3M'd another glass wrap around the whole thing, on the outside of the fillet. I mashed epoxy into the fibers and thoroughly wet out enough to practically see through the fiberglass tape. A simple layer of peel-ply and clamps to ensure the fabric fit down in the fillets nicely, let cure overnight, and admire the handiwork. I'd say these aren't going ANYWHERE without some severe hammering. I remembered to add some shims/spacers inside the guide tubes while I was doing this bonding, so both guides are parallel and in good alignment. It's super smooth motion. Yes I couldn't resist putting the horizontal stab back on and seeing how the elevator stick felt ... 'bout the same as before.
 While I had epoxy on the brain, I finished off the rudder ribs. I did two at once, pushing epoxy through the fibers of the 3M'd fiberglass tape, then using a wrap of peel-ply to get a nice finish. In the morning, I pulled off the peel-ply and knocked down the edges with an 80 grit sanding block. Two evenings' work, and the rudder is as good as done!
Oh I just checked the pictures of the elevator guides above. I guess I took the photo between layers. You can see the flox fillets around the 1/4" tube before putting the final wrap over them. Take my word for it, the next wrap actually went on rather well (3M is great stuff).
Sunday, March 21, 2010
William-T-Pique through the Panama Canal!
Slightly off topic, but I very much enjoyed reading Alan's boat-building blog for both his previous projects. Currently, he is sailing around the world and just made the trek through the Panama Canal! The crew is keeping a wonderful news site of their progress with an educational spin: Eye of the World/
I took screenshot videos of the boat passing under the Centennial Bridge and moving through the first Miraflores lock.
Awesome job Alan!
Saturday, February 27, 2010
 I'd really like to hear from anyone reading this ... I opened up the comments to anyone with or without signing in to whatever account thing this site has. Just a few words of "hello" or "having fun reading" or even "I have a hanger and towplane and a trailer you're welcome to use." I'm just curious who all is reading.
So I caught up on some other pressing stuff around the house & office, so I decided to do a little assembly work this morning. Notably, I installed the elevator control line pulleys sometime earlier this week while it was raining.  Now, I also made the control linkage part to connect the sliding tube to the elevator itself. Well, um, there is no elevator per-se. I haven't yet bent the 3/8" tubes to make up the trailing edge for the elevator. Despite this, the elevator leading edge is done and hinged. So it's a little anti-climactic. But now I have another moving part!
The bottom of the control linkage shows off more of the temporary work back here. The marine pulleys from Harken are rather smooth and very nice actually. They'll do much better with larger line. The control tube guides will also do much better when they're bonded to the structure with epoxy and cabosil. The foam anti-twist supports will be nicer too without the wrap of electrical tape, so look out for that to happen when I mix up some big batch for doing ribs in the next month. Speaking of ribs, I did a little work during the last snow storm to attach the horizontal stabilizer to the vertical tail, necessitating some filing of aluminum and using the die set from Harbor Freight.
That's all for now!
Saturday, February 13, 2010
Harbor Freight is my friend
I have heard the name Harbor Freight before, but hadn't ever really looked into them. With the snow finally plowed enough to get out, venturing to Harbor Freight was on the list! Their prices on tools I have bought before were generally half what I paid ... meaning a half-hour drive to the store is worth the savings. I bought several random things, including a tap & die set to make the quick-pins for Goat. I already modified the horizontal stabilizer AN3-30A bolt to accept two lock-nuts (low profile ones) and trimmed it to 1-1/8" long. Now my previously jury-rigged bolt actually stays in by itself! I was thinking hard about getting a drill press for making all those sheet metal parts a bit easier, eventually deciding against it since I'm almost done making those kinds of parts, heh.
In other news, I started a jig to re-bend the keel tube. I have to find some fine-grained sand to stuff the tube before I try to bend it this time. I have been told that will dramatically help reduce the kinking, along with a good jig of course.
No pictures this time.
I did give a go at sleeping inside that igloo by the way. Unfortunately, I didn't put in a secondary vent hole, relying simply on the main entrance for ventilation. After about two hours outside, I woke up extremely light-headed and abandoned it... I was quite warm, I think my CO2 was just not escaping enough without that vent. DOH.
Saturday, February 6, 2010
An igloo?
 Goat is waiting in line behind some RC projects right now ... and then it snowed ~20" today, so we made an igloo in the front yard. Oh yeah :-)
It's big enough inside that I can crouch on my feet and we can get two adults inside. I'm seriously debating sleeping inside just to be EXTREME! Actually, if I kept dry, I'm sure it would be fairly comfortable inside. While digging it out, you could see steam leaving the entrance from body heat melting the snow.  Despite being soaking wet from working several hours on it, the temperature change (or at least getting rid of wind chill) is noticeable. Ah, the insulating power of water!
If I had to do it again, I would buy a snow shovel first.
Sunday, January 31, 2010
A little snowy work
 Finally I beat a stomach bug ... four inches of snow meant staying inside and getting a little work done on Goat.
These are the aft control line guides from G4T14. I have yet to put in the 1/4" spacers, instead simply using a washer to give just enough space for the temporary control line. I think they look pretty slick :-)
I also worked a tad on the rudder, evening up the control throw stops so now the rudder pedals feel more balanced. I'm a bit taken back at the short stroke of the pedal for full ~30deg of rudder deflection. An easy fix will be to lengthen the control arm on the rudder to suit. What should a "normal" stroke for the pedal be (let's say measured at my toes)?
So what's next?
* 8' of 1/4" x 0.035" tubing for the vertical tail internal struts
* peel ply for horizontal stabilizer rib LE and TE wraps for securing the ribs
* redo the bolt hole in the upper vertical tail tube (one hole is out of line with the other, hmmm)
* elevator linkage for inside the vertical tail
* finally do the two cabane replacement tubes
* measure the nose keel bend, make a jig, and bend a new keel without kinks
* 1-1/8" x 0.058" x 20" and 1" x 0.035" x 20" to redo the main structural member from G4N1
(ouch) ... the holes for the cabane pins are not orthogonal as one expects from View D G4N2.
Wednesday, January 20, 2010
Marine hardware: check
 I placed an order with Berkley Point for some hardware ... in fact for pretty much all the marine hardware. A good price break on 25 quick-links made that an easy choice and saved hundreds compared to West Marine. The steel rings are pretty cool and the snap hooks are quite pretty. I dropped in six quick links in the nose section alone. Next for some more cleanup of the nose section, including a new keel and a new structural carry-through since the last one actually wasn't drilled orthogonal as the G4N1 drawing suggests.
Sunday, January 10, 2010
Rudder pedals with some control lines
 I found some time and worked on the rudder pedals a bit this weekend. First, a suggestion from a friend was to get some 6063 bar stock from a local place for easier bending for the rudder pedals. This worked and was a lot less cutting than the 2" wide piece of bar stock I have been making all my parts from. About an hour after cutting the two pieces to length, I had them both bent (using a spare drill bit to make the bend radius) and then spent some time getting the pieces mounted to the pedals and symmetric left and right. Then I made the little support pieces from 1/4" x 0.035" tube to triangulate the structure.
 Here is an overview picture of the control rigging. The piece of white going from the pedals to the nose bolt is just string and will get replaced by some 3/16" shock cord, per plans. For now, it's just providing some resistance so the pedals don't fall over!
The elevator rigging is about how it'll be. I still need to get some larger washers to hold in the turn-around pulleys mounted in the center of the photo. I only had some small AN washers on hand. Anyhow, yeah the control rigging is coming along nicely. Here is a closeup of the line guides on the control rod tube and the front seat tube. In earlier photos, I had the elevator line guides on the bottom of the tube, before I realized they went on top. I just flipped around that tube :-)
I also put in a little plastic end cap in the aileron torque tube, you can see on the right middle of the picture. I liked how the plastic caps dressed up the front and other tubes, so I sampled one that would fit in this location. Much prettier!
One more thing. My homebuilder buddy has made custom seats for other folks using foam bases. I'm hoping we can get together to fit the space better and be a bit more secure than the parachute cord version.
One other thing. I put in an order for 25 quick-links, several 2" marine snap hooks, and a few stainless steel rings. They should get here middle of next week. Cool, hardware!
Tuesday, January 5, 2010
Two rudder pedals installed
 I had a pair of pair of pieces (4 total) to attach the first rudder pedal. Tonight I whipped up 4 more to attach the second rudder pedal. Now both of my pedals are riveted to their hinge pieces and are mounted on the eye bolts. Cool. Now I need to make the long 9" u-shaped piece that makes a place to capture my shoes and attach the control lines too. All in good time...
 Here is an image of putting the hinge supports on. The holes are match drilled by using a cleako and a clamp after the first one and then replacing the clamp with another cleako. This way I'm assured that the holes are all aligned when I install rivets.
