Saturday, December 12, 2015

Oratex tests

A sample kit of Oratex UL600 from Lars at betteraircraftfabric.com is my first real look at covering Goat.  I watched a good bit of youtube looking at covering techniques of Oratex, but in the end, it's just like model airplane covering.  It couldn't be any more similar, with the exception that you paint the adhesive onto the fabric and structure instead of it coming pre-applied.  Once dry, an iron sticks the fabric onto the structure, and a heat gun pulls out any wrinkles in the open bay panel.  Very straight-forward.

The sample of white that Lars from betteraircraftfabric looks a lot more pigmented than the "natural white" color.  I suppose if you were painting, it would be fine with natural, but the pigmented white looks much nicer to me.

Boy UL600 is thin.  Not entirely sure what I was expecting in the fabric.  Maybe something more akin to a Dacron hang glider leading edge?  That stuff is stiff.  UL600 is thin and light, by comparison.  That makes sense given it'll take somewhere around 40 sqyd of fabric for Goat (rough estimate).  At 3.24 oz/sqyd coated (per the datasheet), that's about 8 pounds of fabric weight.  Adding glues and tapes will be a few more pounds I guess. 

I tried to stick a finger through the covering sample and it has some resistance, but just flexes and doesn't break.  A coworker of mine has a maule tester that will be interesting to see used on this test piece.

For surface prep, I went over the aluminum with a green scotchbrite pad, which definitely removes the shine and leaves a haze with a visible brushed look.  I just wiped this with a clean cloth, but had a couple spots that seemed to fisheye when applying the adhesive.  Not sure if this was insufficient scuffing or insufficient cleaning.  Next time I'll use a wipe with isopropyl to make sure any finger greases or dust is removed.

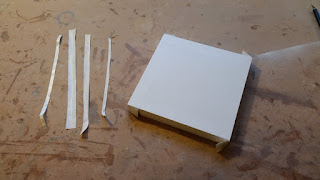
Fabric and frame built and prepped; glue is dry on the frame and dry on just the edges of the fabric (you can see a difference in color/texture).
Mid-way through the covering process, having just gone around the perimeter and wrapped two edges.

Almost finished.  Now I'm waiting for another round of glue to dry so the edges can be ironed down.


Done.


I found this review helpful:
http://www.kitplanes.com/issues/31_7/builder_spotlight/oratex_covering_21029-1.html

Monday, November 2, 2015

Looking toward covering

In thinking about covering, I see there are several bolts that would do much better if they were flipped over.  For example, the leading and trailing edge bolts are much better with the head toward the bottom.  As I understand it, this isn't a traditional bolt direction for airplanes.  Nonetheless, I flipped every bolt on the right wing that is better upside down.  Aircraft Spruce also got an order last night for a dozen bolts that needed a length change.  Sandlin specs almost exclusively even dash-number bolts, but a half dozen -13's were needed and a few others looked better too.  The aileron doesn't fold over very nicely with a long AN42B eyebolt either.  Despite being $8.95 each, I bought a couple that were 1/4" shorter to accommodate the aileron folding over.  The bolt shank is long enough still that the threads aren't in shear.  Minor, but makes a difference to me.

Looking toward covering choice, I'm leaning toward the Oratex that Yando Goat (Alan Beavis) used.  This covering looks to be consistently lighter than regular Stitts or Stewart Systems and is completely non-toxic (i.e. no positive pressure air system or masks needed).  The rub is that the price is somewhere around $67 a sq yd ... and covering requirement for Goat is around 40 sq yd for the wing alone.  I've read a lot about the covering online and impressions are generally positive or a variant of "it's not like I'm used to, therefore it's not as good."  If you have an opinion or experience, leave a comment!  I might need to go read more on the airchair forum...

That's about where things stand.  Next interesting item up is the ribs for the ailerons and flaps.  Oh and working toward bonding on the ribs to the leading and trailing edges.  Here's a couple pictures of the glass tape before epoxy.


Edit: Here are Alan's comments about Oratex reprinted from here:

Please read these observations with the knowledge that this is the first aircraft I have covered (apart from a couple of model planes in my youth).

The appeal of the Oratex was the lack of "nasty" chemicals, the finished fabric weight being able to be calculated and what looked to be a straight forward covering process with a quality finish.  This had to be weighed up against the cost and that there would be a shortage of "experts" to go to if I needed help.  I didn't keep exact numbers, but the material, glue and tapes cost $3000 - $3500AUD. At least $1000 of that was transport/customs fees. Not cheap to get stuff sent to Oz. I estimated it would've cost $1800 ish if I bought the Stitts products from the supplier here in Oz.  As a test I ordered enough to cover the tail boom and tail feathers and would make a decision on the wings after trialling it.

The process is simple enough, but it does involve a lot of time waiting for glue to dry before activating it with the iron and the glue needs to be applied to both the fabric and frame. If you want details on the process go to http://www.oracover.de/index.php/downloads/viewcat/18-1-instructions.html and download the Oratex UL600 instructions.  Unlike the Stitts process, once the glue has been activated with heat the process is irreversible so I proceeded slowly at the start until I became familiar with the process and developed my skills.
It's not possible to glue the fabric to the frame after shrinking as with the Stitts so this needs to be considered prior to covering.

Obviously I was happy with the quality of the finished product as I ordered the rest for the wings.

The material is available in 900mm or 1800mm widths. I ordered a 10m roll of the 1800mm initially and then a follow up order of 30m for the wings. I probably have about 4m left after finishing.  I went through about 3 litres of the heat dispersant glue and several rolls of different widths of their tapes for reinforcement and frame protection under the final covering.

Here's a time lapse video of the covering of the top surface of a wing. The glue has already been applied to the frame as well as the fabric and rivet and bolt heads covered with tape. It represents about 5 hours of work, but unfortunately the camera ran out of space before the shrinking was finished, but you'll get the idea.
http://www.youtube.com/watch?v=7p7BIDTHzfo

cheers Alan

Monday, October 12, 2015

Aileron mechanism rework

I must say thank you to Alan of the Yando Goat for his plans updates (posted on the airchair yahoo group).  His additional two small parts to the wing make the aileron actuation look possible.  I knocked out the two parts within about an hour of waking up and had them installed a few minutes later.  The control line passes over the rib nicely.  Awesome.

The control rod looks like it can clear the strut attachment now.  However, the control horn is in the wrong spot by a few inches, but I see Alan moved its location over slightly to compensate.  Wish I had found all this before putting holes in the LONG aileron leading edge tube; think I can put a bolt in each of the old holes and it is safe.

Before you say anything, I am going to replace the washer holding the quick link in place with a larger one that fits better.  And I obviously still have to switch the masking tape for fiberglass and epoxy to hold the aileron slide tube guides in place.

Thanks to Yando Goat!  Now go watch one of his awesome videos for encouragement:
https://www.youtube.com/watch?v=uAw93maL1tg

Saturday, October 10, 2015

Aileron and flap hinging

It took some combination of the original drawings and the extended wing to find locations for all the hinge points, but they're set now.  I also took the liberty of setting the flap and aileron lengths within the three inches of extended span.  Beyond that, the process is stock.  The trailing edge tube gets a hole that is measured a surface-distance away from the top of the tube; an easy way to get this is to use a long straight-edge touching the top of the leading and trailing tubes and sliding this back and forth to leave a line.  From there, the surface distance gives a mark for the hinge bolt.

Root before hinging

Root after flap hinge installed

Typical wing control surface hinge.

The aileron control surfaces also have a control horn attached to the leading edge tube.  This is a simple mechanical arrangement for actuation, but seems to be quite stiff with the horn near the center hinge.   

The picture shown here has red control line holding it up in position for the photo, so just ignore that.  I have to get more line to have enough for the whole wing control rigging.

Where the control rod attaches to the horn is also the same area for the attachment of the wing strut tube.  Another Goat builder said this tube will interfere with the control rod, and it certainly appears that way.  I'd like to find some pictures of Alan's build and see how he did it.

For visual interest, I cut four foam ribs to build up the flap in chord and see how it looks at full size.  The flap is about 2/3 the span of the aileron, but it's still quite large. 

In none of the Goat versions are the flaps actuated.  Instead, they are held fixed by the control rigging between the tail and the wing, but that comes later.  First I have to make two dozen more ribs, which I am planning to do on my CNC, then add carbon rods and fiberglass tape.  For now, it's just cool to get a feel for the size of the surface and see how the surfaces move.

I also added the last braces for the root rib, and riveted them, admitting the wing won't need to go back down on the surface plate (i.e. concrete floor) anymore.  On that note, I also riveted the wing tip handle in place.  Last tasks for this wing are:
  • tip rib bending
  • tip rib bracing
  • bend the last standard wing rib that goes near the tip also
  • glass the ribs to the leading and trailing edges
  • aileron trailing edge tube bending
  • fit aileron trailing edge tube into the control horn sub-assembly
  • make a dozen or more foam ribs for the control surfaces
  • glass the control surface ribs in place with a carbon rod capstrip
  • control line guide tubes
  • control line pulley to turn downward to the aileron linkage in the fuselage
  • leading edge foam sheeting
  • a few odds & ends, like flipping the orientation of some bolts and replacing one compression strut that has some extra holes in it
After that whole list, I can jump to the other wing and simply copy all the measurements.  I'm better at duplication than making modifications to existing measurements.  The other wing should go quickly as long as I get to a point of cranking out wing ribs quickly ... that's what I got hung up on before.

Maybe I'll assemble Goat in the driveway tomorrow to examine the strut to aileron linkage interference, and to open up the garage for sweeping up all the aluminum shaving debris.  It should be nice to have some space to run the CNC as well.

Sunday, October 4, 2015

Aileron control linkages

Did a bit more work today since I am on a roll.

The aileron control linkage sub-assembly is now complete, awaiting a hinged aileron tube to give it something to actuate.  Nice to knock out some parts like this that come together quickly and give a sense of accomplishment while making later assembly go quicker as well.

I remember reading another Goat build that switched to torsion rods for the aileron actuation.  So far I'm building the stock pull-pull arrangement and will see if it looks okay before making changes.

This photo looks a bit awkward, but shows the attachment of the aileron actuator mechanism sub-assembly into the wing.   The attachment to the compression strut just needs to be epoxy and glass and it's ready for installation of the pullies. 

One step closer...

Saturday, October 3, 2015

Rainy day wing work

Apparently I don't like hot weather for building.  On the other hand, a nor'easter make great building weather in the garage!

Spent a few nights this weekend bending ribs.  Finally have enough for one wing half, so they're now taped on to see what it looks like.  I'm much more accustomed to building model airplanes, so it's wild to build ribs at this size.

The root rib is installed and is getting its braces temporarily installed. 

Before the ribs go on, I need to build the ailerons and flaps.  Since I stretched the wing a dozen inches, the hinge locations will be moved slightly, and I have to stare at it a bit before committing.
The third dimension on the wing really changes how it looks.  I grabbed some peelply from the basement to make a mental image of what it might look like covered.  Cool.

Locations of visitors to this page